React class vs function 클래스 라이프 사이클 사용법
React class vs function 클래스에서 라이프 사이클 구현 하기
📍React 17 이후 부터는 componentWillMount, componentWillUpdate, componentWillReceiveProps
라이프 사이클이 더 이상 사용이 안됩니다.
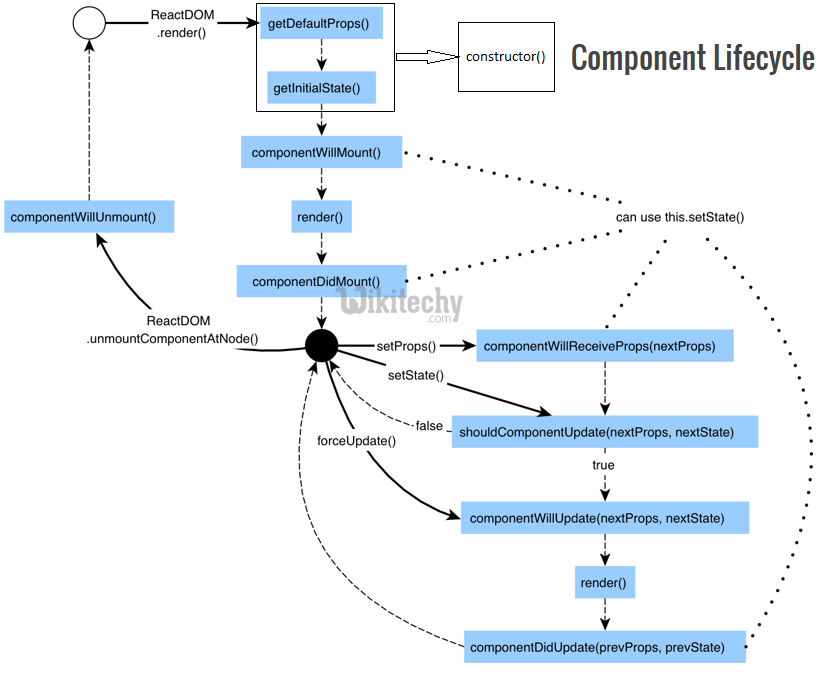
아래 사진은 class 방식으로 react component를 만들 때 여러 메소드가 어떤 방식으로 호출되는가를 잘 보여주는 사진입니다.
컴포넌트가 생성이 되었을 때 getDefaultProps(), getInitalState() 메소드를 실행한 뒤 우리의 관심사인 componentWillMount() 라는 메소드를 react가 호출하도록 약속되어있습니다.
어떠한 컴포넌트가 생성되기 전에 처리해야 할 일이 있다면 componentWillMount() 를 구현하는 걸 통하여 컴포넌트가 생성되기 직전, 즉 render() 메소드가 호출되기 전에 해야 할 일을 componentWillMount() 에서 처리할 수 있습니다.
그다음 render() 메소드가 호출되면 마운트가 됩니다. 즉 화면에 그려집니다.
그다음 해야 할 일이 있다면 componentDidMount() 메소드를 그 컴포넌트를 구현하는 개발자가 구현하는 걸 통하여 컴포넌트가 생성된 후에 해야 할 일을 처리할 수 있게 할 수 있습니다.
lifecycle 구현
componentWillmount()- 컴포넌트가 생성되기 전에, 즉
rednder()메소드가 호출되기 전에 처리해야할 일이 있을때 사용합니다. - 아래의 콘솔창에 잘 구현될걸 확인할수 있습니다.
- “%c” 명령을 사용해 콘솔 출력에 CSS 스타일을 적용할 수 있습니다.
- 컴포넌트가 생성되기 전에, 즉
const classStyle = "color:red";

class ClassComp extends React.Component {
  state = {
    number: this.props.initNumber,
    _date: new Date().toString(),
  };

  componentWillUnmount() {
    console.log("%cclass => componentWillMount", classStyle);
  }

  render() {
    console.log("%cclass => render", classStyle);
    return (
      <div className="container">
        <h2>class style component</h2>
        <p>Number : {this.state.number}</p>
        <input
          type="button"
          value="random"
          onClick={function () {
            this.setState({ number: Math.random() });
          }.bind(this)}
        />
        <p>Date : {this.state._date}</p>
        <input
          type="button"
          value="date"
          onClick={function () {
            this.setState({ _date: new Date().toString() });
          }.bind(this)}
        />
      </div>
    );
  }
}

componentDidMount()render()호출된뒤에componentDidMount()메소드가 호출되는걸 확인할수 있습니다.
 componentDidMount() {
    console.log("%cclass => componentDidMount", classStyle);
  }

컴포넌트가 한번 만들어진 다음에는 컴포넌트에 변화가 생길것 입니다. state가 바뀌거나 props가 바뀌게 될겁니다.
바귈때마다 render() 메소드가 실행될것인데 그전에 render() 메소드가 호춣할 필요가 있냐 없냐를 결정하는 shouldComponentUpdate() 가있습니다. 그리고 componentWillUpdate(), componentDidUpdate()가 있습니다.
📍 이 시점부터 componentWillMount, componentWillUpdate, componentWillReceiveProps 는 빼고 공부하겠습니다.
componentDidUpdate()사진에서 random 버튼을 누르면 새로운 날짜 data가 업데이트 되면서componentDidUpdate()메소드가 호출됩니다.
const classStyle = "color:red";

class ClassComp extends React.Component {
  state = {
    number: this.props.initNumber,
    _date: new Date().toString(),
  };

  componentDidMount() {
    console.log("%cclass => componentDidMount", classStyle);
  }

  componentDidUpdate() {
    console.log("%cclass => componentDidUpdate", classStyle);
  }

  render() {
    console.log("%cclass => render", classStyle);
    return (
      <div className="container">
        <h2>class style component</h2>
        <p>Number : {this.state.number}</p>
        <input
          type="button"
          value="random"
          onClick={function () {
            this.setState({ number: Math.random() });
          }.bind(this)}
        />
        <p>Date : {this.state._date}</p>
        <input
          type="button"
          value="date"
          onClick={function () {
            this.setState({ _date: new Date().toString() });
          }.bind(this)}
        />
      </div>
    );
  }
}

댓글남기기